how to take your first night sky photograph
- Mark Chase

- Jun 28, 2017
- 3 min read
Updated: Apr 25, 2018
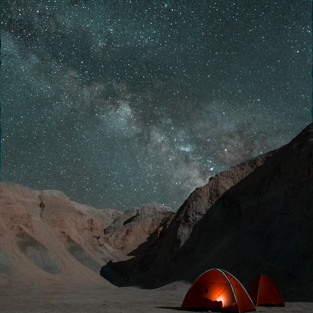
As beautiful as the desert was during the day, the real secrets came out every night.
When I first knew that Co-Director of Toughness, Faith Briggs and I would be spending our nights on the desert floor for our most recent mission the first thing that came to my mind was obviously, SNAKES! But after that small panic attack, I turned my focus to the opportunity that every night, after the sun went down there would be clear skies and very little light pollution.
Just as I had always wanted to capture the Northern Lights in Iceland and Canada I was determined to take advantage of this opportunity and capture the milky way above the desert.

Each night after we set-up camp, I would wander off in search of the perfect spot to sit and watch the milky way arch across the night sky.
Now, before I go any further I’d like to make it clear that I am in no way the authority on night photography. I am lucky enough to have some friends back in the UK who gave me some helpful tips for capturing the magic that happens after dark. I am going to share these tips with you!
Firstly, you’re going to need a camera body that can handle a high enough ISO. I personally use the FujiFilm XT-2. I’ve never used the Sony range but I understand they are phenomenal. Some of the best night sky photos I’ve seen have been taken on the Canon 6D but even some of the lower spec models will work as starting point.
The manual on this kind of thing says that you need a wide angle lens to capture as much sky as possible. For me it’s not as important as the fast lens, f2.8 or faster will be just fine. Then of course, a solid tripod and a way to trigger the camera without touching it. A remote, your cell phone, or the self-timer function on the camera.
As far as location goes I try to choose an interesting foreground feature. I prefer something more than just the night sky. Often I will look for something I can light up to really make the image interesting.
If you want to get technical there are lots of apps that will help you find the Milky way and direction of stars at different times of the year. I use PhotoPills but there are lots of other great options available.
Looking up the moonrise and moonset times will help you decide when and where to shoot. It’s amazing how much light the moon omits, so if the stars are your focus, you’re probably going to want to shoot on a clear moonless night.
Pro Tips
Any movement will cause your photograph to be blurry, for this reason my ‘pro tip’ is to always turn off the Long Exposure Image stabilization. My understanding of this feature is that even when the camera is still it is searching for movement which isn’t ideal in this situation. If you’re using a DSLR you may also want to consider selecting the Mirror Lock up function to ensure minimal movement when the camera is at work.
When it comes to taking the shot, the first problem you’ll find is focus. I always try to shoot with a lens that offers an infinity focus point. I’ve struggled to find focus when I haven’t but I’m told that focusing on the moon or brightest star you can see will work.
Any movement will cause your photograph to be blurry, for this reason my ‘pro tip’ is to always turn off the Long Exposure Image stabilization.
The next part is all about trial and error and can vary night to night, location to location. I will shoot on the fastest f number I can, f2 or f2.8 usually.
I’ve also found that anything over a 15 second exposure and you start to see movement in the stars, so depending on the type shot you’re after, keep it under 15/20 seconds for nice crisp stars. If you’re looking for star trails you can crank this up to 30 seconds or beyond.
The main setting I adjust is the ISO, as is often the case I want to shoot with the lowest ISO possible to avoid getting a grainy photo but often have to bump up the ISO to get enough light into the picture. This is where your camera body choice will either reward you or frustrate you. Try an ISO setting of 3200 and go from there.
Share your night sky images with me on Instagram @markjameschase


Images - Mark Chase


Comments